Tuesday, March 11, 2014

DIY Upcycled Wedding Decor!

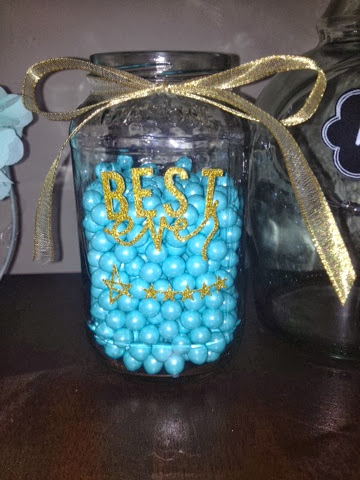
Anyone who knows me knows how much I enjoy upcycling! In my own little way I'm saving the planet and I get to be creative and make cool stuff from the items I recycle. So why would I not incorporate this practice into my business? When working with my first bride, I wanted to stress to her the importance of recycling cans and glass bottles/containers to use as centerpieces, so I decided to make a display for her demonstrating what they'd look like up cycled. A little inspiration never hurt anyone!
 
The can in the pictures is a recycled vegetable can with a chalk board label from Michaels,


 and the candy jar is a recycled spaghetti jar with gold glitter sticker lettering added for detail,
 
These were super easy to make. I used a wet chalk pen on the labels and my glue gun to secure everything! Hope this was helpful to someone out there. Weddings should be elegant and fabulous, but like I always say, they don't have to break the bank!


Saturday, March 8, 2014

DIY Photo Booth Props


Photo booths are huge in the world of weddings right now. I mean, who doesn't want to take silly
pictures with faux mustaches and tops hats? We've all got a little goofy in us.

These particular props were inspired by a post I came across on Pinterest. However, I was in a bit of a hurry so I did not use any stencils to trace, but instead free handed them...which was actually a lot easier than I thought. Ok I lied...I did trace the glasses from a pair of kid foam ones I found in the party section of target. (I'm good, but not that good). Those were the most difficult only because I had to use my etching tool to cut out the frames and that was some heavy duty paper.

Btw all of the materials (hard felt, glammed out craft paper, and sticks) came from The Santuary a.k.a Michaels. I'm sure there are hundreds of free printables you can use to trace your props, but don't be afraid to test your own artistic abilities.

I must say, I suprised myself (half smirks). Anywho let me know if you have any questions and if you do decide to make these post a picture in the comments section. Id love to see...as long as they're not better than mine...jk....kind of.


Friday, March 7, 2014

DIY Wedding Planner

Yesterday I met with my very first Bride. I wanted to do something special for her to let her know I was serious about making every detail of her wedding absolutely spectacular, so I decided to make her a wedding planner.

I purchased the binder and dividers from Office Depot. Their See Jane Work collection is so chic and feminine! After my trip to Office Depot, I dashed over to Michaels to see what I might find to decorate her binder and customize it specifically for her. I found some bejeweled stick on flowers as well as some bright blue glitter lettering I thought would really make her binder pop.

Lastly, I realized I had no idea how to organize a wedding planning binder, so I took a trip to Barnes and Noble and peaked in a few of theirs. They were gorgeous, but pretty pricy if you ask me. I organized her binder into five parts: the big picture, the budget, the wedding party, vendor contacts, and the guests. But you can organize your binder however you like! It only cost me around $15 to make my Brides planner as opposed to the $35+ ones being sold at Barnes and Noble. Being organized when planning a wedding is certainly a must, but so is budgeting expenses. Try and keep costs down when possible and incorporate various DIY's. Planning a great wedding doesn't mean you have to break the bank!